Saturday, November 30, 2013

Doodle Inspired Mosaic

Here is the beginning of my Zentangle or Doodle inspired mosaic.


This section, black tiles, stacked like brick, but square, I added these great accent beads.


Here I added a border, looks a bit zipper like.


This will be the area below the ground line, the small glass pebbles, will appear to be the dancer's shadow.

Zentangle, Doodling, Random Drawing...it's all about pattern and design, drawing what you feel, spontaneously. I attempted to plan out my patterns, but I couldn't get it to work with the mosaic. So I just started...randomly laying in pattern.


Wednesday, November 20, 2013

Black and White

My Inspiration

I like to doodle. I love to draw patterns and shapes just to create wonderful, whimsical composition. I have done this for years...in high school on my notebooks and yes, even sometimes on the desk. I have discovered that this doodling has a name, trademarked, Zentangle. So, I guess this is what I do...or my art is Zentangle inspired.  I call it doodling with style!

These "tangled or doodled" dancers are the inspiration for my next mosaic.


I enjoy creating these fun lively dancers, each with her own personality. 

These "Zentangled" or doodled dancers were actually inspired by some of my previous mosaic dancers.


Sunshine


This is a journey, I have realized that my dancer's are evolving, the inspirations come from one to create another...but that will be fuel for a new topic!

My vision is to create a mosaic, a dancer, using black and white, to create patterns that will make her come alive....stay tuned!


Thursday, September 19, 2013

What Lies Within

I apologize for being absent for so long. But here is my finished piece, created out of stained glass on mirror and slate.


This piece looks amazing when the light cause the glass to flash and reflect these brilliant colors!

Monday, June 17, 2013

Slate and Stained Glass Abstract

Quite a few years ago we had the old slate roof taken off our house and put a new roof on. I saved some of the old roof shingles, think I would use them for ....something....
Finally, I decided to use the shingles in combination with mirror and stained glass to create an abstract piece. And Yes, I am inspired my artist Helen Nock!!!


I broke up the shingles and laid them out so they looked as though it was one large piece that was breaking apart. I put mirror down where the cracks between the slate is. On the mirror, I used small pieces of stained glass of different bright colors. The mirror reflects through the glass beautifully.


I love the contrast between the brilliant, reflective colors and the rough, gray slate.


The slate is not glued down yet, but I like to lay it out as I'm working to get a feel for what the final piece will look like.


This glass reminds me of candy....when the light reflects the mirror under the glass, it looks so brilliant, coming through the slate pieces.

More to come soon.


Monday, April 29, 2013

En Avant!!!!!!!

It's been a long process and there were times I thought I'd never complete this project! But here we are finished at last!  

The next step is the delivery to the National Museum of Dance in Saratoga Springs, NY.  There it will be photographed along with the other 24 pointe shoes and set up for the Unveiling on May 31st. This event is open to the public.


En Avant

This will be displayed this summer and fall at the
Saratoga Performing Arts Center
Saratoga Springs, NY

Thursday, April 25, 2013

Finishing Touches....

I can't believe I am almost finished!!! All of the mosaic work is complete so now I am painting the details.

Here I have painted the foot beige, I will also paint a coat of and iridescent finish on this.


Here is some details on the dancer's face. I still have to touch up a little more...the details seem to be taking forever. Also I have to really clean the glass so it sparkles to the max!!!


Thursday, April 18, 2013

Getting down to the details...

Here is the dancer's little slipper. I used beads to mosaic this. It was rather awkward because it was a difficult positions to reach. But it did work out nicely!


I am so excited about the way this shoe sparkles when the sun shines on it.  It acts like a disco ball splashing the room with pretty dots of light!


Here I am in the reflected light...the whole room is full of sparkles!!

Today I worked on the dancers hair...I'm using beads and gold paint.


Here, I have started putting on the beads with Apoxy Sculpt...


These beads will really ad sparkle to her hair.


Her hair is painted with a gold tone paint, I've added a head piece, that compliments the straps on the big shoe. I have a lot of cleaning up and touching up to do...that's never ending.

Stay tuned...its almost complete!!!!!!


Tuesday, April 9, 2013

Tutu time!

The dancer's tutu will be red stained glass and under is gold seed beads 


Here you can see where I've started applying the glass. I like the way it compliments the seed beads. I am using GE II silicone to apply the glass and I have sprinkled it with some glitter to give it some sparkle...can't really see it in the photos.


For the top part of the skirt, I used Apoxy Sculpt and beads to make a petal detail, this covers the uneven edges of the glass.


I use the same method to create the bodice. I really love the beadwork and it works so well, pressing the beads into the Apoxy Sculpt.


I just have to clean it up and them move on to finishing the edges of glass on the skirt.

Stay Tuned!!!


Monday, April 1, 2013

Grouting!!!!!

I now have most if this grouted...I still need to do the base.

This is the heel of the shoe all grouted.


I love the way the black grout brings out the ball chain details!


This was a ton of work!!
But I love the black grout and this whole piece really sparkles!!

The ribbon is my favorite part...I love the richness....


I still have to grout the base....that will be later this week...my fingers are worn to the bone from grouting.....so the next step will be the dancer's tutu.
Stay tuned!!!


Wednesday, March 27, 2013

Beads, Glass and Tile...Oh My!!!

Since my last post, I have been very busy!  I have been working on the ribbon, the dancers tutu and the base.

Ribbon

Here I started working on the ribbon. This is the edging...I am alternating iridescent gold tiles with gold mirror glass, trimmed with ball chain.


The center part of the ribbon is red mirror glass. This is a little fussy to do since I am working on a curved surface. I have to cut each piece in half or even in thirds to get it to lay flat and follow the curve of the form. 


Tutu and Tulle

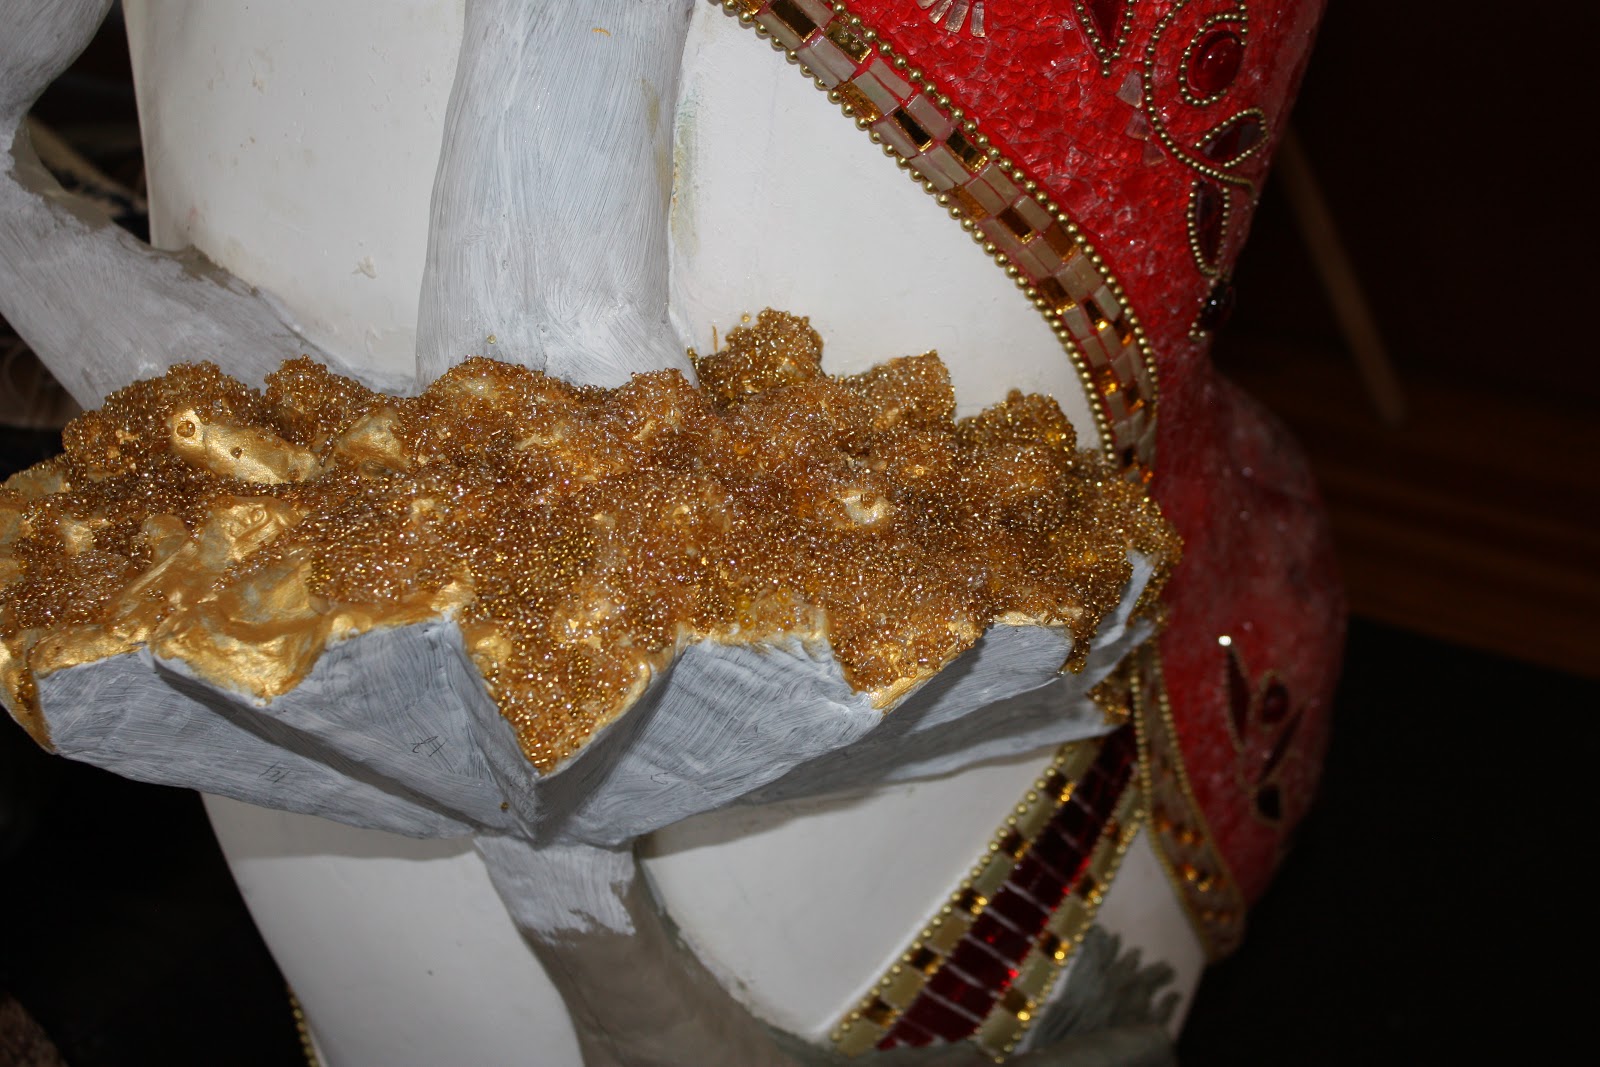
My dancer's tutu is going to have a very structured top and I want it to appear as tulle underneath....some of it is completed in the above picture. I used gold seed beads to give the effect of fluffy tulle. to apply the beads, I had to turn the form upside-down and use 2 part epoxy to glue them on.


This was a really messy job. It took a little figuring out how to get the beads on...first I just spread the epoxy on, then poured on some beads....the beads went everywhere, not matter how carefully and slowly I put them on. But I had to work quickly, since the epoxy sets up very quickly.


After some experimenting, I found the best way to apply the seed beads was to mix my epoxy in small, workable amounts and add the beads to the epoxy and then spread it on like peanut butter! It took some doing, but it worked very well!


Here you can see a section finished...It does have the appearance of tulle!

The Base

For the base, I am simply using black tile and trimming the edge with ball chain.


This will be grouted with black and the edge will be painted black to match.

The Sole

I am using clear glass pebbles to mosaic the sole of the shoe to give it a different texture than the tempered glass. I am embedding the pebbles in a layer of clear silicone adhesive. I like the way it softens the shadow. 


Here is the sole completed, also the ribbon and base.


Front view...ribbon, base and tulle completed.


You may have noticed that I gave the dancer some hair. I did this for a couple of reasons. First, her arm needed more support, since it was lifted away from the form.  The hair going behind her arm fills in the gap between the arm and the form. And or course, my dancing ladies ALWAYS have wild flowing hair!!!!

stay tuned....


Tuesday, March 12, 2013

The Work Continues...

I finally have the dancer's skirt completely covered with Apoxy Sculpt. The under side of the skirt, I will mosaic with beads, the top will be red stained glass.


Apoxy Sculpt is a wonderful product! It's perfect for adding a sculptural element to your art, a perfect substrate to mosaic on!


Trim Work!

I started the trim on the shoe, using iridescent gold tile and gold mirror glass.


Here you can see how the glass reflects when the sun is shining on it.
I love the flashes of red and white. 


Next...the ribbon...stay tuned!